.Net Script 简介
.Net Core 工具 dotnet-script 简介
总结
> dotnet tool install -g dotnet-script  # 安装 dotnet-script
> dotnet script --help # 显示帮助文档
> dotnet script init # 创建脚手架脚本
> dotnet script # 进入 REPL 模式
> dotnet script hello.csx -i # 执行脚本 hell.csx 后进入 REPL 模式
> dotnet script hello.csx # 执行脚本 hello.csx
> dotnet script -d hello.csx # 以debug模式执行脚本 hello.csx
> dotnet script -d hello.csx -- arg1 arg2 # 以debug模式执行脚本 hello.csx, 并传入两个参数: arg1, arg2. 脚本内部使用全局变量 Args 接收参数.
> dotnet script hello.csx -s https://SomePackageSource1 -s https://SomePackageSource2 # 执行脚本时指定多个Nuget包源地址
> dotnet script https://dwz.cn/xpsKTaoi # 执行远程脚本
> ls -al | dotnet script UpperCase.csx # 接收管道输入
> dotnet script exec path_to_dll -- arg1 arg2 # 执行 dll 文件, 并传入两个参数: arg1, arg2.
> dotnet script publish main.csx -o publish_dir -c Release # 编译脚本为独立可执行程序
脚本内指令:
- 首行加入
#!/usr/bin/env dotnet-script, 并把脚本文件更改为可执行文件, 可以直接执行. #r "nuget: Newtonsoft.Json, 12.0.2"引用nuget包#load "nuget:simple-targets-csx, 6.0.0"引用nuget上的脚本包#load "./other-script.csx"引用其他脚本文件
使用.Net CLI运行C#脚本, 使用VS Code编辑脚本并引用Nuget包. 所有OmniSharp支持的语言都支持这些特性.
安装
要求
我们只需要安装 .Net Core 2.1+ SDK 即可.
.Net Core 2.1 Global Tool
.Net Core 2.1 增加了全局工具(global tool)的概念, 这意味着你只需要.Net CLI就可以安装 dotnet-script.
> dotnet tool install -g dotnet-script

Tools directory '/Users/alan/.dotnet/tools' is not currently on the PATH environment variable.
If you are using bash, you can add it to your profile by running the following command:

cat << \EOF >> ~/.bash_profile
# Add .NET Core SDK tools
export PATH="$PATH:/Users/alan/.dotnet/tools"
EOF

You can add it to the current session by running the following command:

export PATH="$PATH:/Users/alan/.dotnet/tools"

You can invoke the tool using the following command: dotnet-script
Tool 'dotnet-script' (version '0.29.1') was successfully installed.
这种方式的好处是你可跨平台使用相同的命令安装 dotnet-script.
/Users/alan是我的用户目录, 安装完成后为了方便使用dotnet-script命令, 你可以把目录/Users/alan/.dotnet/tools添加到环境变量PATH中, 或者使用ln -s /Users/alan/.dotnet/tools/dotnet-script /usr/local/bin/dotnet-script添加到现有的PATH目录中.
使用 .Net CLI 安装完
dotnet-script后, 需要检查是否添加了DOTNET_ROOT环境变量, 否则执行dotnet-script后会报以下错误:$ dotnet-script
A fatal error occurred, the required library libhostfxr.dylib could not be found.
If this is a self-contained application, that library should exist in [/Users/alan/.dotnet/tools/.store/dotnet-script/0.29.1/dotnet-script/0.29.1/tools/netcoreapp2.1/any/].
If this is a framework-dependent application, install the runtime in the default location [/usr/local/share/dotnet] or use the DOTNET_ROOT environment variable to specify the > runtime location.如果你是使用官方安装包(Installer), 而不是下载二进制包(Binaries)安装的.Net Core, 那么安装完成后系统可能就已经增加了
DOTNET_ROOT环境变量, 环境变量的值是.Net Core的安装目录, 比如我的系统可能就是export DOTNET_ROOT=/usr/local/dotnet-sdk-2.2.104.
.NET Core SDK 也支持查看已经安装的工具列表, 以及卸载功能:
dotnet tool list -g

Package Id         Version      Commands
---------------------------------------------
dotnet-script      0.22.0       dotnet-script
dotnet tool uninstall dotnet-script -g

Tool 'dotnet-script' (version '0.22.0') was successfully uninstalled.
Windows
choco install dotnet.script
我们也提供了PowerShell安装脚本:
(new-object Net.WebClient).DownloadString("https://raw.githubusercontent.com/filipw/dotnet-script/master/install/install.ps1") | iex
Linux and Mac
curl -s https://raw.githubusercontent.com/filipw/dotnet-script/master/install/install.sh | bash
如果权限不允许, 你可以尝试使用sudo:
curl -s https://raw.githubusercontent.com/filipw/dotnet-script/master/install/install.sh | sudo bash
Docker
在Linux容器中运行 dotnet-script 的 Dockerfile 也是被支持的. 开始构建镜像:
cd build
docker build -t dotnet-script -f Dockerfile ..
然后执行:
docker run -it dotnet-script --version
Github
你也可以从Github releases page手动下载所有zip格式的版本.
Usage
dotnet script中经典的 helloworld.csx 演示看起来像下面这样:
Console.WriteLine("Hello world!");
这就已经完成了, 我们可以执行这段脚本了(参数列表可以通过全局的Args数组访问):
dotnet script helloworld.csx
脚手架
在你的系统中创建一个文件夹, 然后执行以下命令:
dotnet script init
这会创建一个 main.csx 文件, 和一个可以在VS Code中调试的启动配置文件.
.
├── .vscode
│   └── launch.json
├── main.csx
└── omnisharp.json
我们也可以使用自定义的文件名来初始化一个文件夹.
dotnet script init custom.csx
我们现在有了一个名为 custom.csx 的文件, 取代了之前默认的 main.csx 文件.
.
├── .vscode
│   └── launch.json
├── custom.csx
└── omnisharp.json
备注: 在一个包含一个或多个脚本的文件夹执行
dotnet script init不会创建main.csx文件.
运行脚本
如果脚本是可执行文件, 可以直接通过shell执行.
foo.csx arg1 arg2 arg3
OSX/Linux
就像所有其他脚本一样, 在 OSX/Linux 系统中, 脚本第一行需要有
!#, 而且必须通过命令 chmod +x foo.csx 使文件变成可执行文件. 使用 dotnet script init 创建的csx文件会自动添加指令!#并标记csx文件为可执行文件.
OSX/Linux 系统的 shebang 指令为 #!/usr/bin/env dotnet-script
#!/usr/bin/env dotnet-script
Console.WriteLine("Hello world");
你可以使用 dotnet script 或者 dotnet-script 来执行你的脚本, 这种方式允许你通过传递参数来控制脚本的执行.
foo.csx arg1 arg2 arg3
dotnet script foo.csx -- arg1 arg2 arg3
dotnet-script foo.csx -- arg1 arg2 arg3
向脚本中传递参数
所有 -- 后的参数都会被传递给脚本:
dotnet script foo.csx -- arg1 arg2 arg3
然后你在脚本的上下文中使用全局的Args集合来访问传递进来的参数:
foreach (var arg in Args)
{
    Console.WriteLine(arg);
}
所有 -- 之前的参数都会交由 dotnet script 处理. 比如下面的命令:
dotnet script -d foo.csx -- -d
-- 之前的参数 -d 传递给 dotnet script 用于开启debug模式, 而 -- 后面的 -d 会被传递给脚本.
NuGet 包
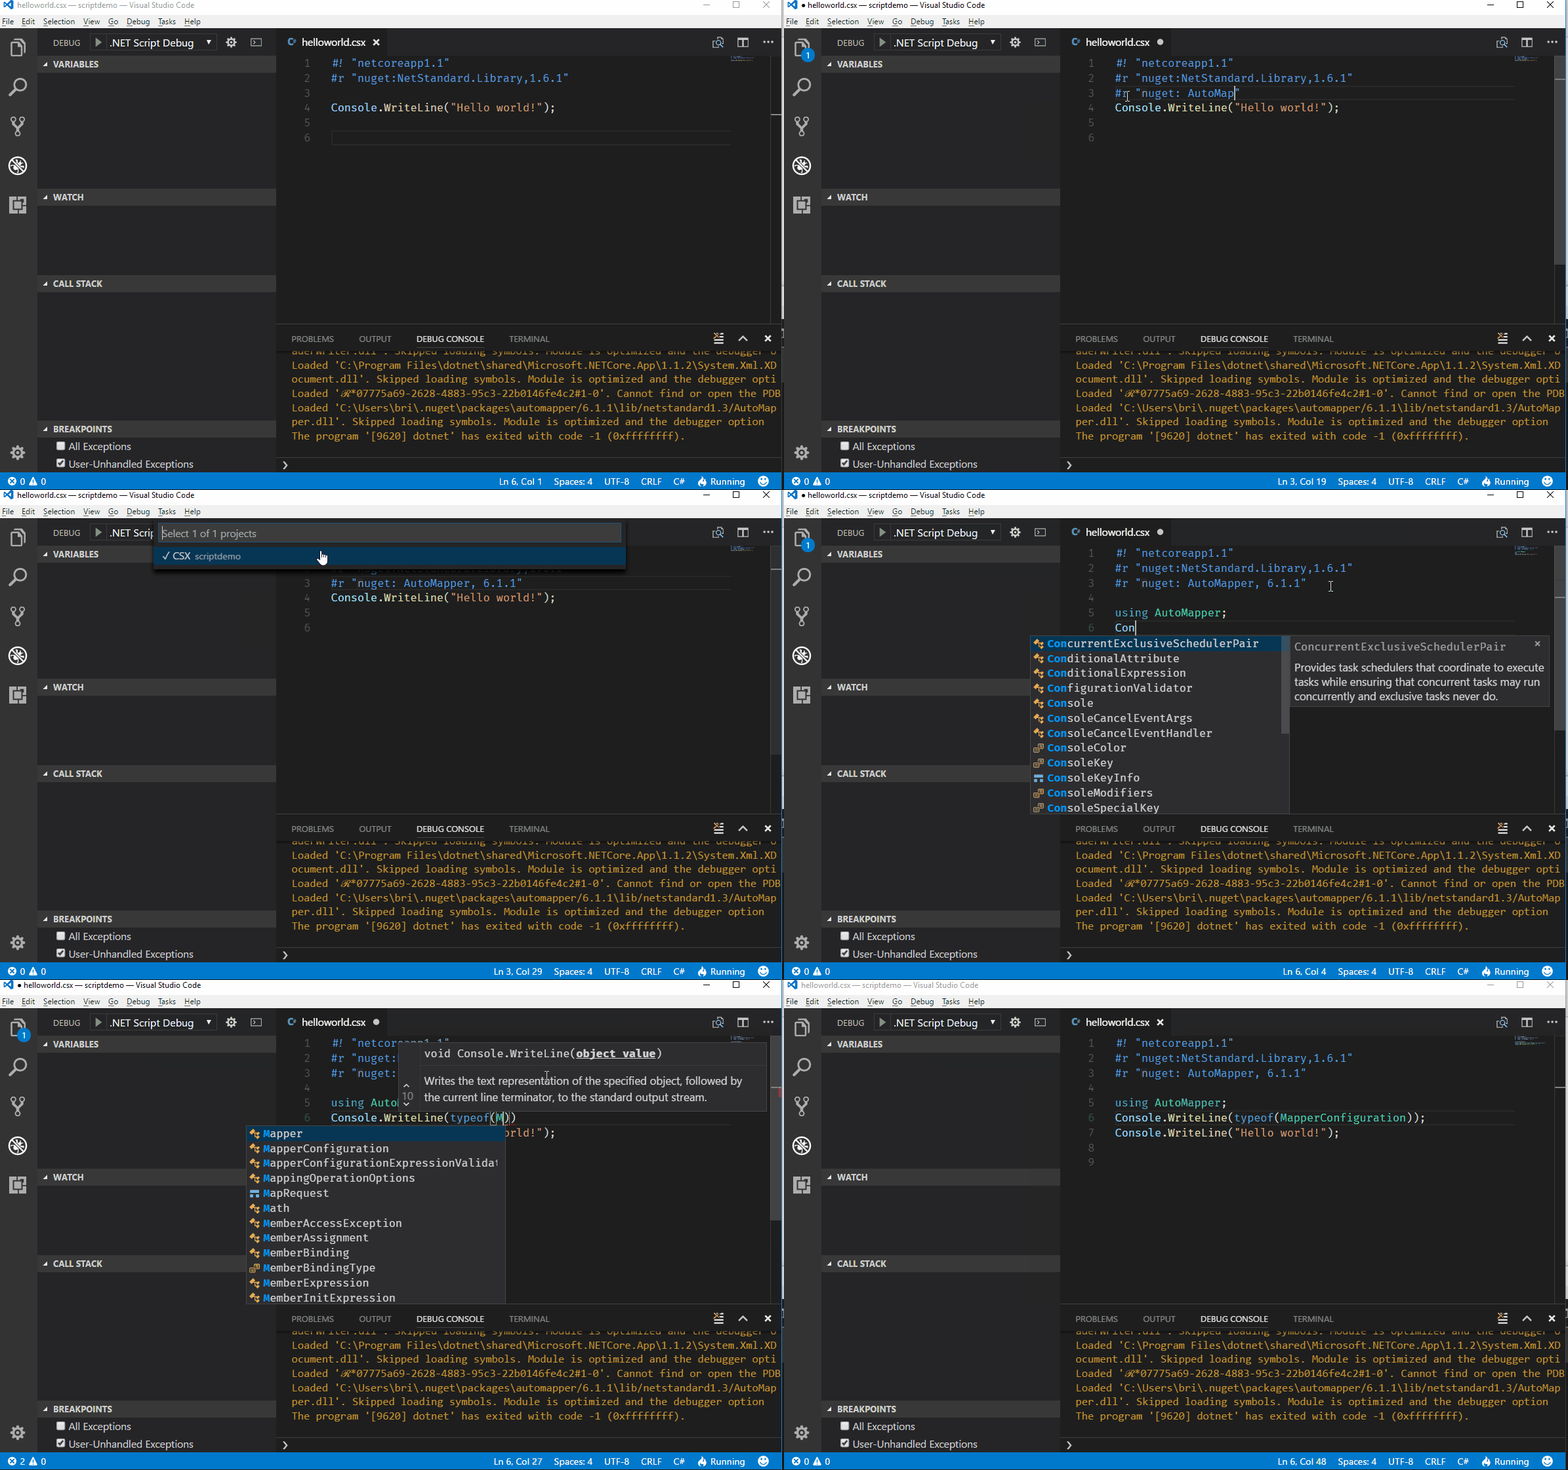
dotnet script 支持直接在脚本中引用Nuget包(内置功能).
#r "nuget: AutoMapper, 6.1.0"

备注: 在添加了包引用之后需要重启 Omnisharp .
Nuget包源
我们可以直接在脚本根目录的 NuGet.Config 文件中定义包源. 另外在脚本执行时, 会借助提供语言服务的 OmniSharp 进行从包源中进行包解析.
我们可以在用户级别或者系统级别定义Nuget包源(这里有相关介绍 Configuring NuGet Behaviour )来替代本地Nuget.Config维护.
也可以在执行脚本的时候指定包源.
dotnet script foo.csx -s https://SomePackageSource
同时指定多个包源:
dotnet script foo.csx -s https://SomePackageSource -s https://AnotherPackageSource
从CSX文件创建DLL或者可执行文件
Dotnet-Script 可以为你的脚本创建独立的可执行文件或者DLL文件.
比如 dotnet script publish main.csx -o publish_dir -c Release -d
| 开关 | 对应全称开关名称 | 描述 |
|---|---|---|
| -o | --output | Directory where the published executable should be placed. Defaults to a 'publish' folder in the current directory. |
| -n | --name | The name for the generated DLL (executable not supported at this time). Defaults to the name of the script. |
| --dll | Publish to a .dll instead of an executable. | |
| -c | --configuration | Configuration to use for publishing the script [Release/Debug]. Default is "Debug" |
| -d | --debug | Enables debug output. |
| -r | --runtime | The runtime used when publishing the self contained executable. Defaults to your current runtime. |
发布后的可执行文件无需依赖 dotnet install 即可执行. DLL可以使用 .Net CLI 执行:
dotnet script exec {path_to_dll} -- arg1 arg2
缓存
我们提供了两种类型的缓存 dependency cache 和 execution cache. 为了使缓存能够开启, 要求NuGet包引用必须指定确切的版本号. 这个限制的原因是 我们无法执行过时依赖树的脚本? (The reason for this constraint is that we need to make sure that we don't execute a script with a stale dependency graph.)
依赖缓存 Dependency Cache
为了解决脚本依赖, 在生成 project.assets.json 文件的回调中执行 dotnet restore. project.assets.json 文件指定了所有添加到编译的依赖.
This is an out-of-process operation and represents a significant overhead to the script execution. So this cache works by looking at all the dependencies specified in the script(s) either in the form of NuGet package references or assembly file references. If these dependencies matches the dependencies from the last script execution, we skip the restore and read the dependencies from the already generated project.assets.json file. If any of the dependencies has changed, we must restore again to obtain the new dependency graph.
Execution cache
In order to execute a script it needs to be compiled first and since that is a CPU and time consuming operation, we make sure that we only compile when the source code has changed. This works by creating a SHA256 hash from all the script files involved in the execution. This hash is written to a temporary location along with the DLL that represents the result of the script compilation. When a script is executed the hash is computed and compared with the hash from the previous compilation. If they match there is no need to recompile and we run from the already compiled DLL. If the hashes don't match, the cache is invalidated and we recompile.
You can override this automatic caching by passing --nocache flag, which will bypass both caches and cause dependency resolution and script compilation to happen every time we execute the script.
调试
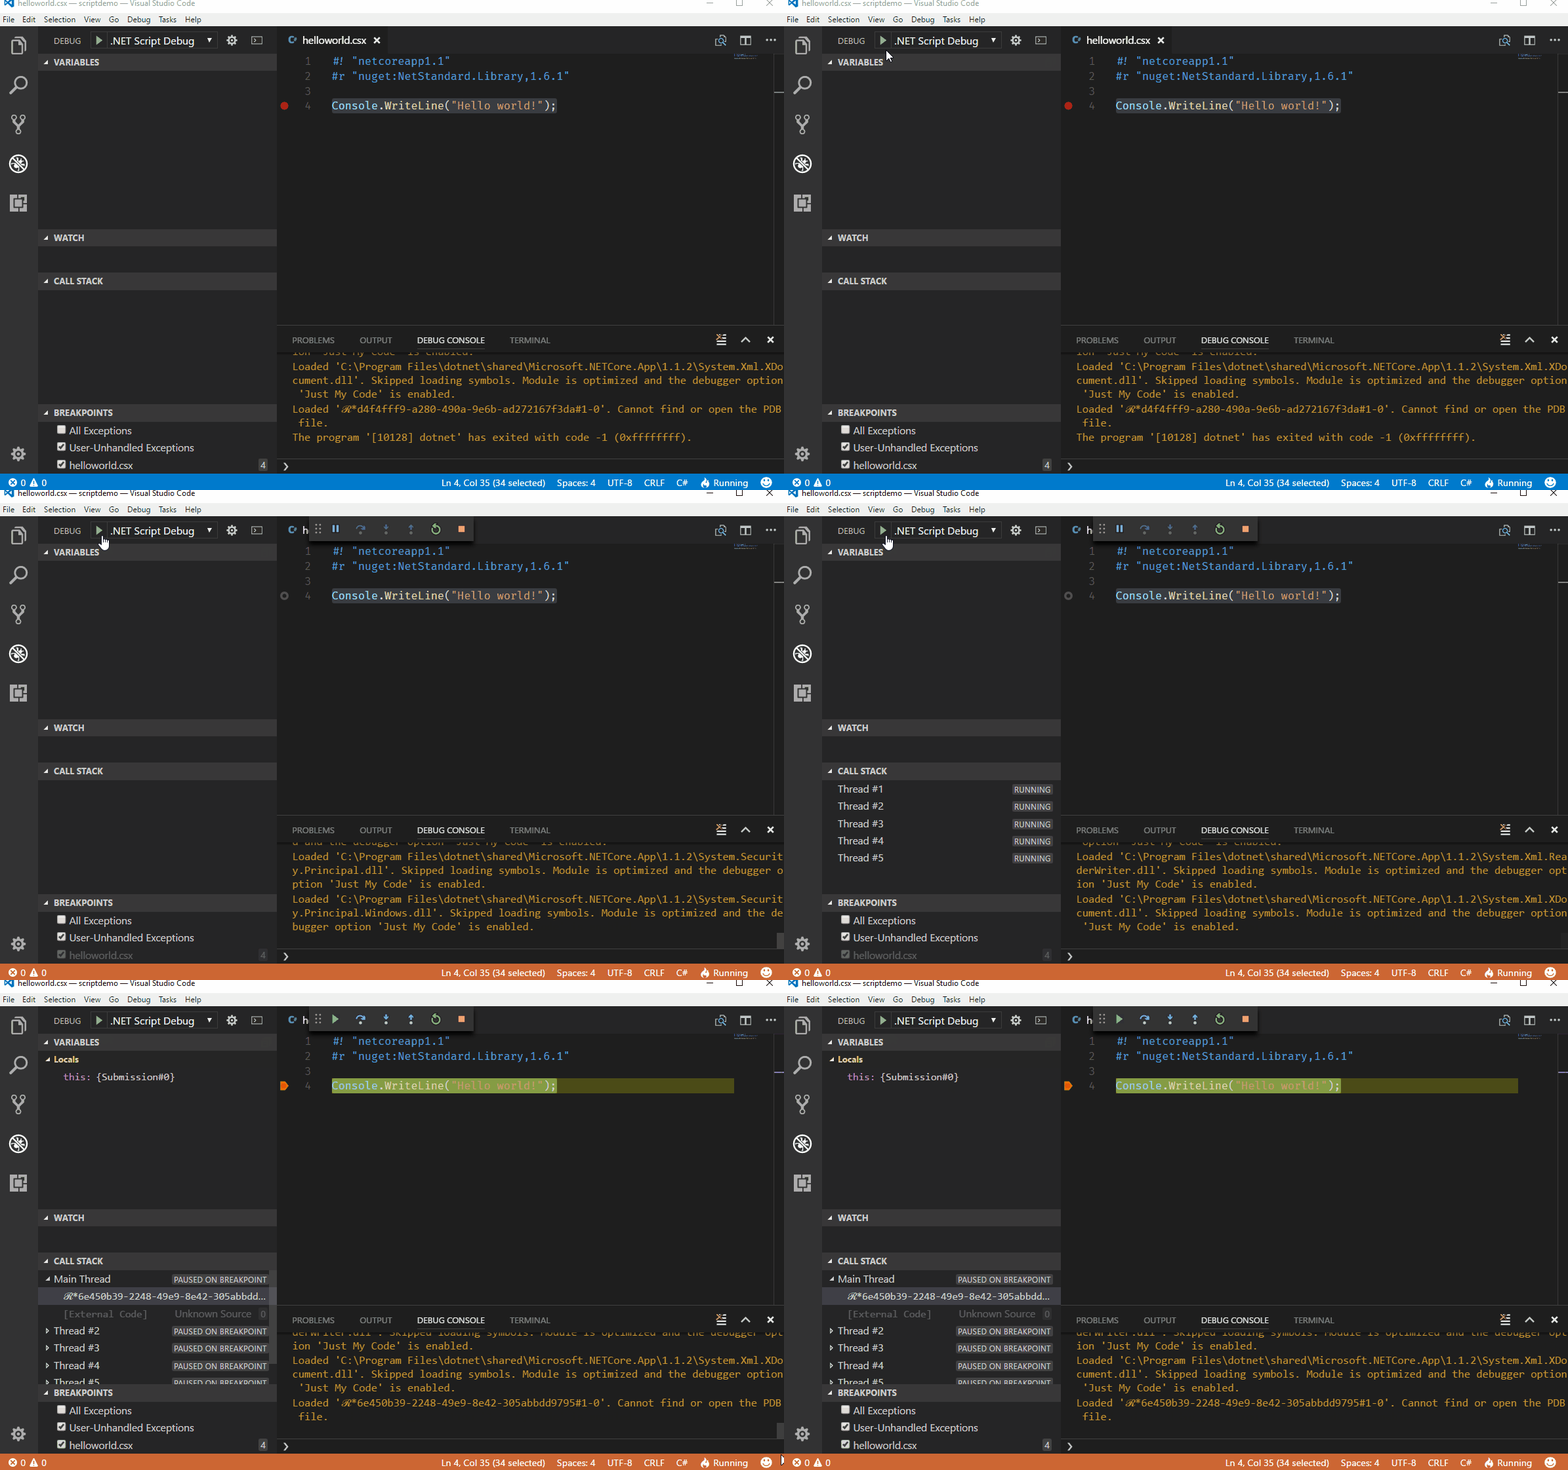
使用 Console.WriteLine 进行调试的时代已经过去了. dotnet script 的一个主要特性是能够直接在VS Code中调试脚本. 只需要在你的脚本中设置好断点, 然后按下F5即可调试

脚本包 Script Packages
脚本包是把可复用脚本组织好发布到Nuget包管理, 让其他脚本消费使用. 这意味着我们现在就可以借助现有基础设施而不需要凭借自己的力量从头开始.
创建脚本包
脚本包就是一个常规的Nuget包, 脚本文件包含在 content 或者 contentFiles 文件夹中.
下面的例子演示了根据standard convention脚本包是如何在Nuget中展开的.
└── contentFiles
    └── csx
        └── netstandard2.0
            └── main.csx
这个例子仅仅在根目录包含一个 main.csx 文件. 但是脚本包也许在跟目录或根目录下的子目录中中包含多个文件.
当加载一个脚本包的时候, 会先寻找入口去加载. 入口脚本是下面其中之一:
- 根目录中叫
main.csx的脚本 - 根目录中仅有的脚本文件
如果依据以上规则没有找到入口脚本, 会加载包中的所有脚本文件
提供入口脚本的好处是我们可以控制包中其他脚本加载.
消费脚本包
消费脚本包, 我们只需要在 #locad 指令中指定Nuget包.
下面的例子加载 simple-targets 包中包含的脚本文件到我们的脚本中.
#! "netcoreapp2.1"
#load "nuget:simple-targets-csx, 6.0.0"

using static SimpleTargets;
var targets = new TargetDictionary();

targets.Add("default", () => Console.WriteLine("Hello, world!"));

Run(Args, targets);
备注: 调试脚本包也是支持的, 我们可以很容易进入
#load指令引入的脚本.
远程脚本
脚本不需要存在于本机. 我们可以执行http(s)可访问的脚本.
这意味着我们可以创建Gist, 然后执行:
这个 Gist 包含打印 "Hello World" 字符串的脚本
我们可以像以下这样执行脚本:
dotnet script https://gist.githubusercontent.com/seesharper/5d6859509ea8364a1fdf66bbf5b7923d/raw/0a32bac2c3ea807f9379a38e251d93e39c8131cb/HelloWorld.csx
URL 太长了, 我们可以借助短链服务 TinyURL:
dotnet script https://tinyurl.com/y8cda9zt
Script Location
一个非常常见的场景是我们的逻辑需要关联脚本路径. 我们不想让用户来确定这些路径, 下面提供了脚本当前执行的路径和文件夹:
public static string GetScriptPath([CallerFilePath] string path = null) => path;
public static string GetScriptFolder([CallerFilePath] string path = null) => Path.GetDirectoryName(path);
提示: 把这些方法放到一个独立脚本, 作为顶层方法. 然后在你需要访问的脚本文件里通过
#load指令引用.
REPL
这个版本中包含了C# REPL (Read-Evaluate-Print-Loop). 执行无参数的 dotnet-script 开启 REPL 模式.
这个交互模式允许你提供单独的C#代码块, 然后按下Enter立即执行. REPL 和 常规的 CSX 脚本一样使用相同的装配集引用和using语句.
基本使用
Once dotnet-script starts you will see a prompt for input. You can start typing C# code there.
~$ dotnet script
> var x = 1;
> x+x
2
If you submit an unterminated expression into the REPL (no ; at the end), it will be evaluated and the result will be serialized using a formatter and printed in the output. This is a bit more interesting than just calling ToString() on the object, because it attempts to capture the actual structure of the object. For example:
~$ dotnet script
> var x = new List<string>();
> x.Add("foo");
> x
List<string>(1) { "foo" }
> x.Add("bar");
> x
List<string>(2) { "foo", "bar" }
>
Inline Nuget packages
REPL also supports inline Nuget packages - meaning the Nuget packages can be installed into the REPL from within the REPL. This is done via our #r and #load from Nuget support and uses identical syntax.
~$ dotnet script
> #r "nuget: Automapper, 6.1.1"
> using AutoMapper;
> typeof(MapperConfiguration)
[AutoMapper.MapperConfiguration]
> #load "nuget: simple-targets-csx, 6.0.0";
> using static SimpleTargets;
> typeof(TargetDictionary)
[Submission#0+SimpleTargets+TargetDictionary]
Multiline mode
Using Roslyn syntax parsing, we also support multiline REPL mode. This means that if you have an uncompleted code block and press Enter, we will automatically enter the multiline mode. The mode is indicated by the * character. This is particularly useful for declaring classes and other more complex constructs.
~$ dotnet script
> class Foo {
* public string Bar {get; set;}
* }
> var foo = new Foo();
REPL commands
Aside from the regular C# script code, you can invoke the following commands (directives) from within the REPL:
| Command | Description |
|---|---|
#load | Load a script into the REPL (same as #load usage in CSX) |
#r | Load an assembly into the REPL (same as #r usage in CSX) |
#reset | Reset the REPL back to initial state (without restarting it) |
#cls | Clear the console screen without resetting the REPL state |
#exit | Exits the REPL |
Seeding REPL with a script
You can execute a CSX script and, at the end of it, drop yourself into the context of the REPL. This way, the REPL becomes "seeded" with your code - all the classes, methods or variables are available in the REPL context. This is achieved by running a script with an -i flag.
For example, given the following CSX script:
var msg = "Hello World";
Console.WriteLine(msg);
When you run this with the -i flag, Hello World is printed, REPL starts and msg variable is available in the REPL context.
~$ dotnet script foo.csx -i
Hello World
>
You can also seed the REPL from inside the REPL - at any point - by invoking a #load directive pointed at a specific file. For example:
~$ dotnet script
> #load "foo.csx"
Hello World
>
管道
下面的例子演示了如何在脚本中使用输入/输出的管道数据.
UpperCase.csx 脚本简单地把标准输入转换成大写后写入到标准输出中.
#! "netcoreapp2.1"
using (var streamReader = new StreamReader(Console.OpenStandardInput()))
{
    Write(streamReader.ReadToEnd().ToUpper());
}
我们现在简单地把一个命令的输出转入到我们的脚本中:
echo "This is some text" | dotnet script UpperCase.csx
THIS IS SOME TEXT
调试
The first thing we need to do add the following to the launch.config file that allows VS Code to debug a running process.
{
    "name": ".NET Core Attach",
    "type": "coreclr",
    "request": "attach",
    "processId": "${command:pickProcess}"
}
To debug this script we need a way to attach the debugger in VS Code and to the simplest thing we can do here is to wait for the debugger to attach by adding this method somewhere.
public static void WaitForDebugger()
{
    Console.WriteLine("Attach Debugger (VS Code)");
    while(!Debugger.IsAttached)
    {
    }
}
To debug the script when executing it from the command line we can do something like
#! "netcoreapp2.0"
#r "nuget: NetStandard.Library, 2.0.0"
WaitForDebugger();
using (var streamReader = new StreamReader(Console.OpenStandardInput()))
{
    Write(streamReader.ReadToEnd().ToUpper()); // <- SET BREAKPOINT HERE
}
Now when we run the script from the command line we will get
$ echo "This is some text" | dotnet script UpperCase.csx
Attach Debugger (VS Code)
This now gives us a chance to attach the debugger before stepping into the script and from VS Code, select the .NET Core Attach debugger and pick the process that represents the executing script.
Once that is done we should see out breakpoint being hit.
Configuration(Debug/Release)
By default, scripts will be compiled using the debug configuration. This is to ensure that we can debug a script in VS Code as well as attaching a debugger for long running scripts.
There are however situations where we might need to execute a script that is compiled with the release configuration. For instance, running benchmarks using BenchmarkDotNet is not possible unless the script is compiled with the release configuration.
We can specify this when executing the script.
dotnet script foo.csx -c release